I have seen many Pinterest pictures with this idea and decided to give it a try! I used a combination of all the tutorials that were listed with the pictures and just did what works best for me. Feel free to tweak it to fit your style and what item you are using. I used a total of five sweaters, but only four of them had sleeves. For those four, I just used the sleeves as the legs. For the sleeveless one, I simply used the fabric in the middle. And here is how I did it....
First I will show you the steps to using the sleeves:
Step 1: Create a pattern from a pair of leggings that currently fit your little one.
 |
| Lay your leggings on top of paper and trace. Make sure you leave 1" seam allowance on the side & top. You will need 1" on top for the elastic casing & 1" on the sides if you are making the legs from fabric instead of using sleeves. |
 |
| Here is what your pattern should look like compared to the pair of leggings you used. |
Step 2: You are simply going to use your pattern as a "length" guide. Do not worry about it being wide enough. The fabric sweaters are made of stretch so much that will fit. Keep in mind that I was doing a size 12-18 month. If you are doing bigger than this you might not have enough stretch to fit.
I found that using my rotary cutter worked a lot better than cutting with scissors because the fabric moved so much. Here is what my rotarty cutters look like:
Here is what you are going to have now:
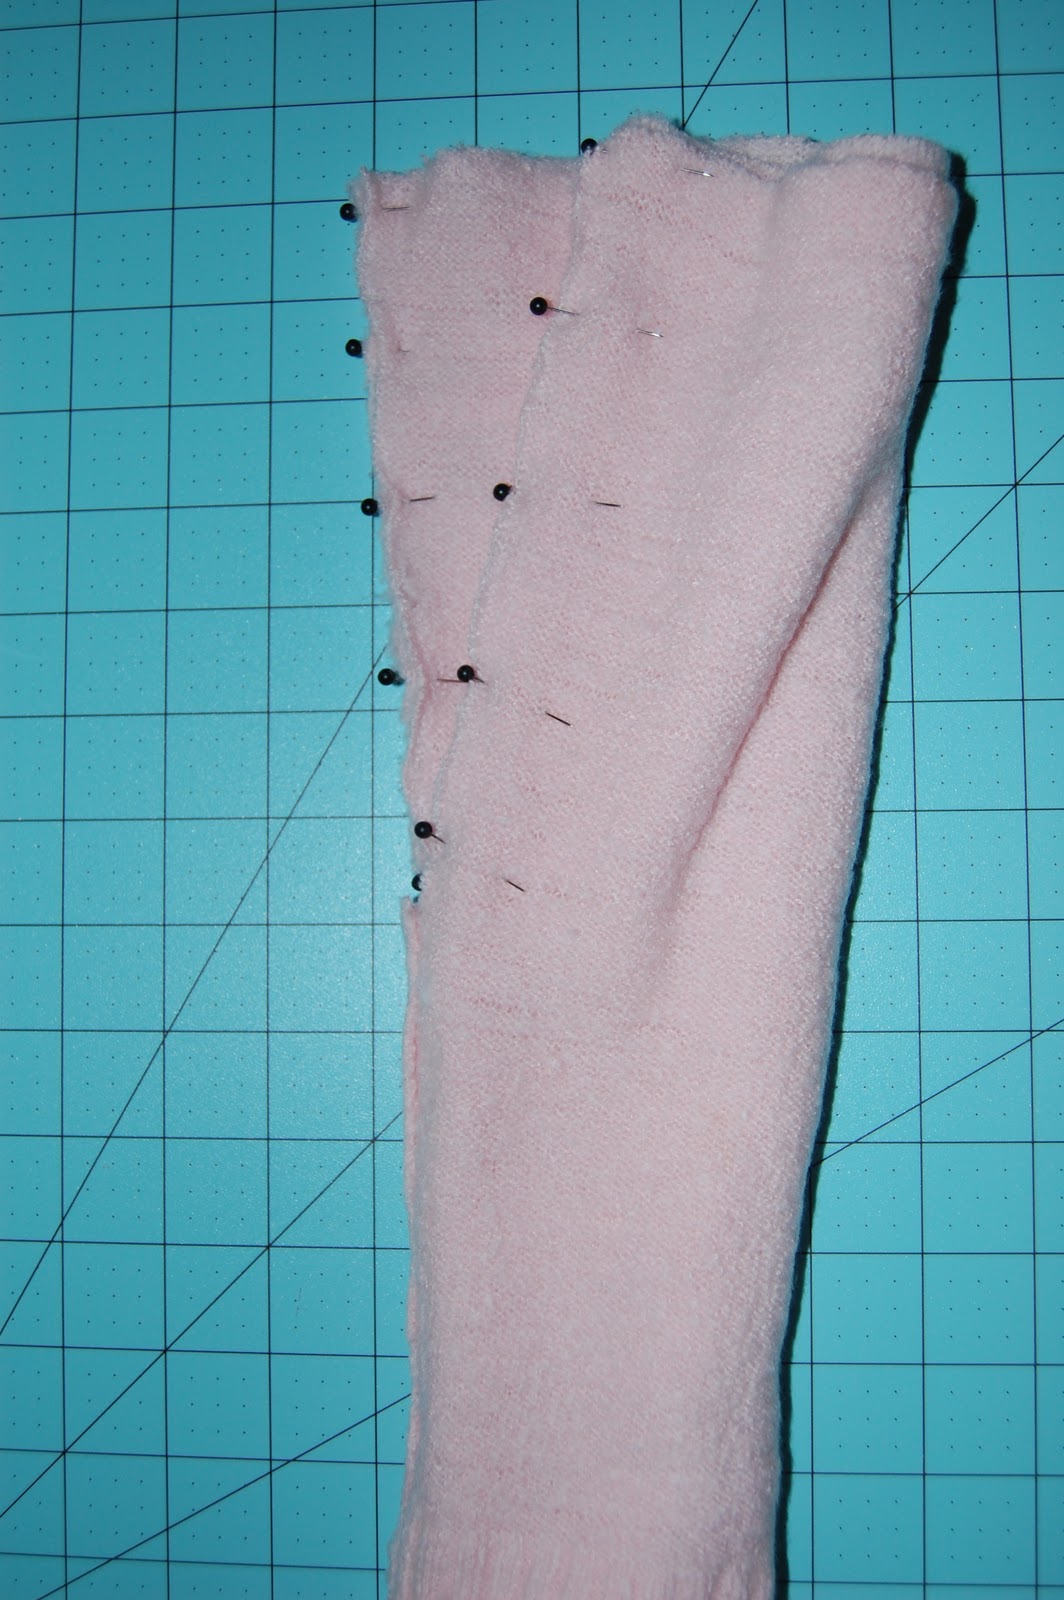
Step 3: Next you are going to make the opening where you are going to attach the legs together. Line up the pattern and mark were your inseam ends, this will tell you how far down to cut open.
 |
I chose to cut down the current seam so that my seams would line up and look nice.
|
Step 4: The next part is a bit tricky. You are going to turn one leg inside out and leave one leg right side in. Take the leg that is right side in and put it inside the leg that is inside out. You are going to want the right sides of the sweater to be facing each other. Pin and sew.
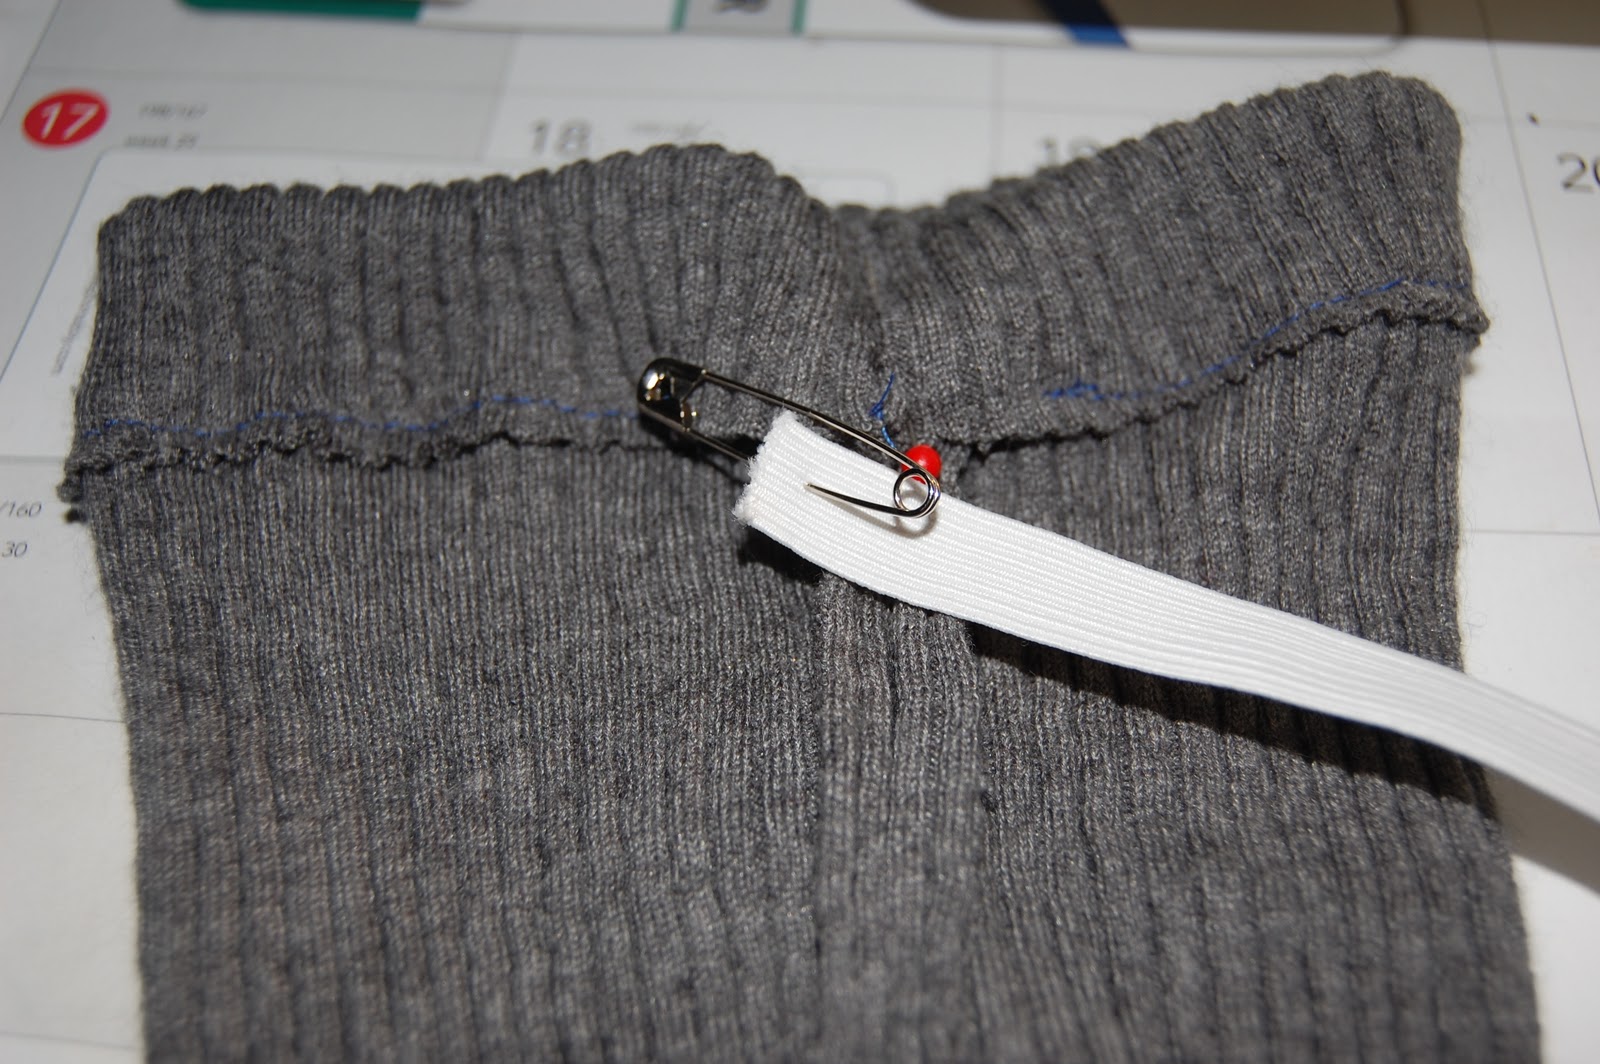
Step 5: Pull the leg back out and keep them inside out. You are going to sew the casing for the elastic next. Fold down the top of the pants about 1". I used a 1/2" elastic for mine. Pin around and sew, making sure to leave a 1-2" gap to pull your elastic through. I used the original leggings as a guide for my elastic length since my little one was napping at the time. You can do this or measure around your child's waist and add 1" for sewing it together. Place a safety pin on the end of your elastic to help pull it through the casing. Once you have pulled it through, sew it together, very very well! Then close up your casing.
 |
| Waist pinned |
 |
| Waist sewed together with 1" gap for elastic to go through |
 |
| Measuring elastic with current leggings, or you could use your child's waist as a guide. |
 |
Use a safety pin at the end of your elastic to help feed it though.
|
Now you have turned this:
Into this!
For the sleeveless one, you are going to use the same pattern. You are just going to use the middle of the sweater as material.
 |
| Here is the red sweater vest that I used. |
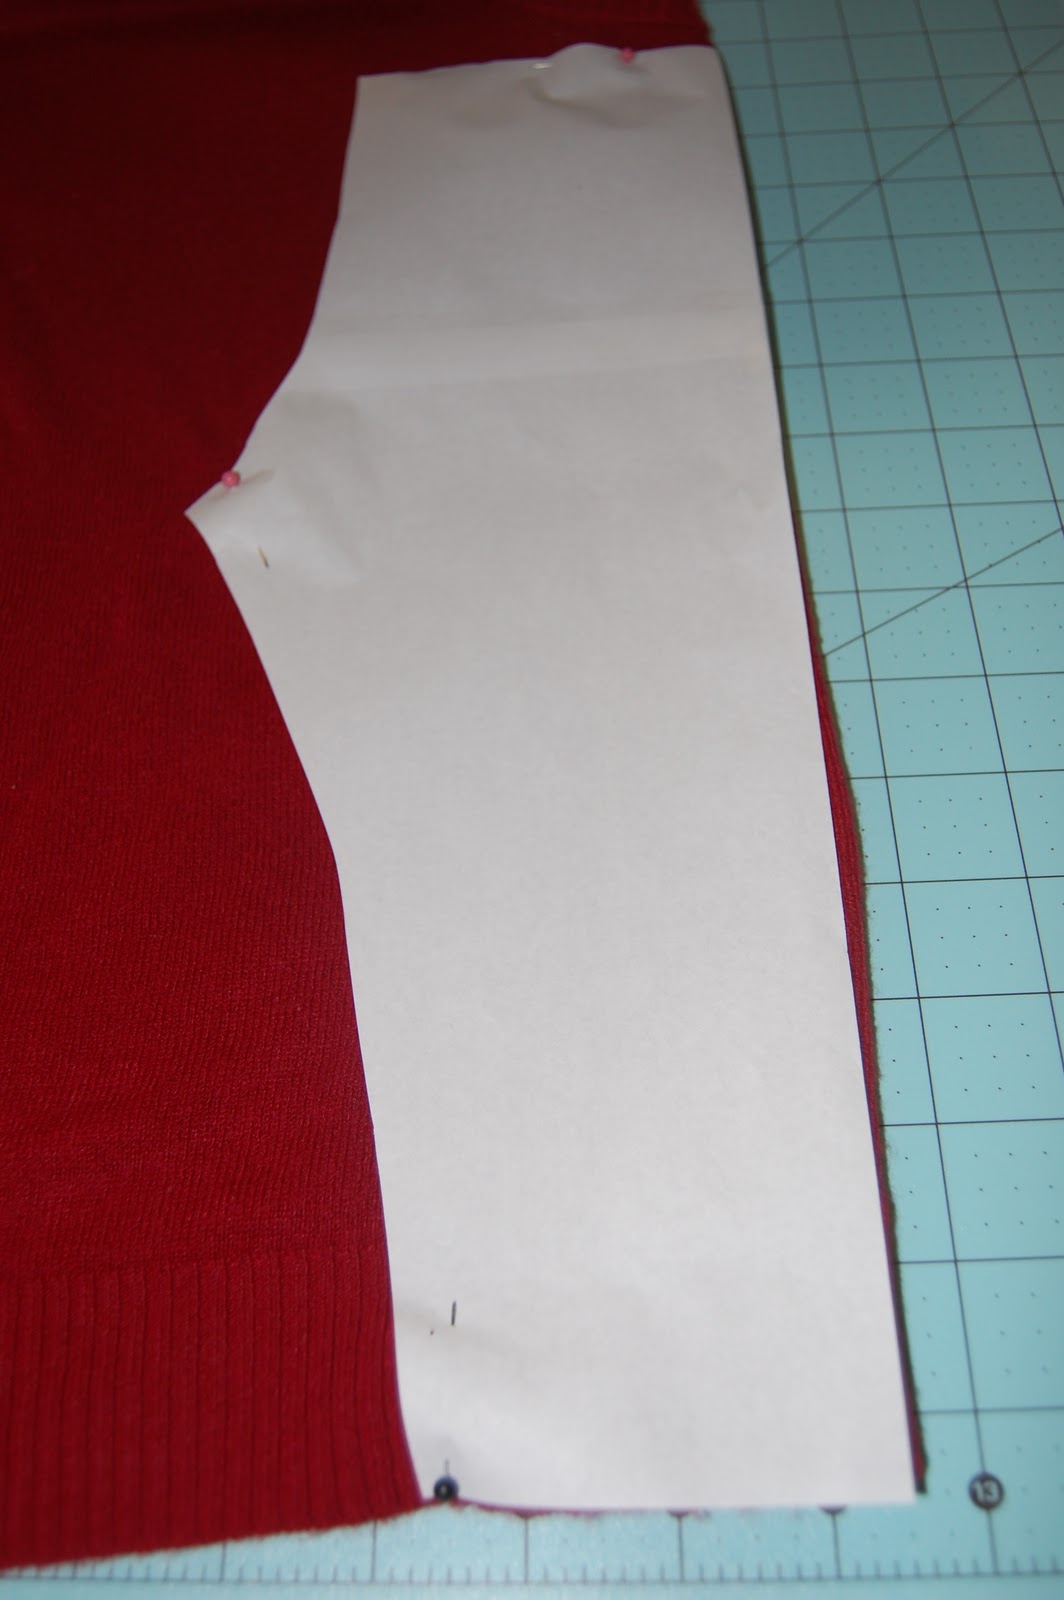
Step 1: Place the straight edge of your pattern up against the seam of your sweater so you only have to sew down one side. Cut both leg patters out. I used my rotary cutter because this material moved a lot and it provided me with more of a straight line.
 |
| Side one. |
 |
| Flip over and do side two. |
Now you are going to have this:
 |
| This is each side opened up. |
Step 2: Next you are going to sew up the leg inseams. Fold the pieces so they are inside out. Then pin the inseams together. You are going to sew from the points all the way down.
 |
| Legs pinned, ready to be sewed. |
 |
| Inseam sewed. |
Step 3: You are going to sew the legs together now. First, turn one leg right side out. Leave the other leg inside out. Place the leg you turned right side out INSIDE the leg that is inside out.
 |
| Here is what it should look like now. |
Now pin the legs together with the right side facing each other.
You are going to sew a "U" shape, down one side and up the other. When you get to the middle where you are meeting up with the inseam, I did a back-stitch just to make sure it would hold. Then gently move the legs so that you are following the line of the pants. Once you have finished that seam, just pull the leg that is inside back out.
Step 4: Sew the casing for the elastic waist band. While your pants are still inside out, fold down the waist about 1". I used 1/2" elastic for mine. Pin your waist down and sew, making sure to leave a 1-2" gap to pull the elastic through. Attach a safety pin to the end of your elastic and pull it through the casing. Sew the ends of the elastic together, very very well to make sure it doesn't pop open. Then sew up the opening and turn right side out.
 |
| And voila! You have a sweet little pair of red leggings ready for the holidays!! |